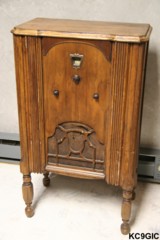
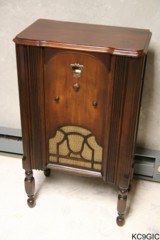
"Before" "After"
Brand:
Airline
by
Montgomery Ward &Co.
Year
of Manufacture: Pre-June
1932
Frequency
Range: 550
-
1600 Kc
Tube Lineup: 80 Rectifier, 45 Audio Output, 224 1 st. R.F., 224 2nd R.F., 224 Detector
Schematic: Available here, courtesy of Nostalgia Air.
Tube Lineup: 80 Rectifier, 45 Audio Output, 224 1 st. R.F., 224 2nd R.F., 224 Detector
Schematic: Available here, courtesy of Nostalgia Air.
On a Saturday in the fall of 2005 I was spending my weekend like usual, cruising antique stores. I came across a newer store in downtown Corydon, by a creek. When I entered the store I was greeting by this miserable looking radio. They guy running the counter knew me from some radio transactions a few years ago, so he offered me a lower price. They had this one priced at $75.00, which I though was way too much for its condition. I told him no thanks.
By the time I looked over the rest of the store and was ready to leave, he once again confronted me with an offer, this time at $30.00. I could tell they wanted to get rid of this thing badly. At the time I was near critical mass on radios, so I ended up packing this into the back seat of my Grand Am. It pretty much sat in storage for a year until November 2006, when I finally took it apart to see if it was halfway restorable.
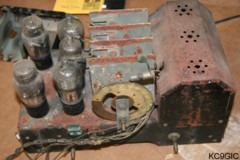
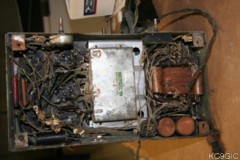
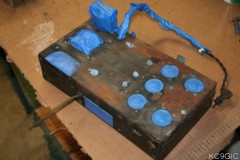
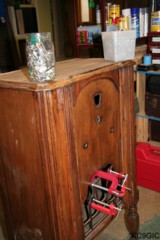
The condition looked rather grim. The cabinet had quite a bit of veneer damage, the two back feet were rotted off, and many of the joints had come loose and were crudely nailed together. The grill over the speaker was broken in multiple places, and the grill cloth was pretty much destroyed. The original finish was almost totally gone. The chassis was not much better. From the rear it looked complete and untouched, but after removal I saw the true story. This thing had obviously seen some fair amounts of moisture in its day, considering the chassis was covered in rust. A mouse had also made a nest under the chassis, eating up most of the cloth covered wiring. Despite the condition, I decided that a total restoration was in order.
Electronic Restoration
The initial inspection of the chassis did not look very promising. The first job was to remove the dust and mouse nest debris. This was accomplished using a brush and a vacuum. With the debris gone, this revealed more problems not seen at first. The next step was a total disassemble of the upper chassis, taking many notes along the way. Below two photos: The chassis before restoration began.
When
the upper components were removed, a good cleaning with a brass
wire brush was in order. This removed much of the loose paint and large
sections of rust. There were a few stubborn parts that required the use
of some jellied rust remover to clean them. After this the chassis was
scrubbed down with mineral spirits to remove and oil or grease. Then
various parts were masked off so it could be painted. Below: The
chassis masked off ready to be cleaned.
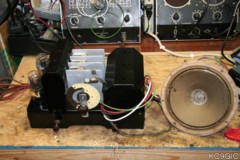
Now it was time to tackle the rewiring job. Using reproduction cloth covered wire from Radiodaze, almost every wire on the chassis had to be replaced. After this was complete, other components were checked. Everything seemed to check out ok except for a large multi tap resistor. It was suppose to read 1000 and 2600 ohms on each section, but both were open. I rooted though my parts drawers and found some replacements that would work, and were high enough wattage for the application. With these repairs finished, it was time to test the tubes. Everything checked out ok with the exception of a 224, which had no emissions. The final step was cleaning the lubing all of the controls. Below photos: The repainted (left) and rewired (right) chassis.

When powering up the radio this time I was greeted by loud and clear reception. Since this is a TRF tube receiver, the alignment was done by adjusting the three trimmers on the tuning capacitor. The dial scale was very dirty and had some large globs of hard dirt caked on it. Some orange cleaning wipes were used to remove the greasy dirt. I tested the wipes out on a small corner to make sure that they wouldn't cause any damage to the lettering first. For the age, former condition, and type of receiver, this one sounds exceptionally good.
Cabinet Restoration
With the chassis up and running, it was time to restore the cabinet. This radio must have been stored in an outdoor building with lots of moisture at one time. The evidence of this was the lifting/warped veneer, the back two feet being rotted off, and the cabinet was full of mud dauber nests. The fist job was to repair the veneer. All of the veneer on the bottom of the sides was lifted and warped. Since I have very little experience with this type of work, a few experiments were a must. Since heat and water make wood pliable, I decided to carefully use an old clothes iron, a wet rag, and some water soften the veneer. When the veneer became soft, a large flat board was clamped down over it, and when the wood dried out, the veneer was once again flat. Once all of the wood repairs were complete, everything was reglued. Below center: The final loose parts are clamped in place and glued.
The next step was to
remove the remains of the original finish, and the newer finish that
someone had applied overt op of that. A scrubbing pad and some mineral
spirits pretty much got rid of these. The entire cabinet was then
sanded with some 220 grit sand paper and wiped clean with a tack
cloth. Next some some Bartley's brand wood filler was applied,
letting it dry for 24 hours, and then once gain sanded. This pretty
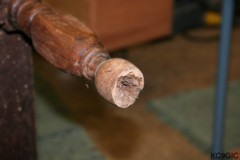
much had the cabinet ready for a new finish. The only remaining problem
was the back two feet, which were missing the bottom inch due to rot. I
used some stainable wood filler to fill in the missing portion, and
then sanded it to shape. To match up the filler with the rest of the
wood, and little bit of walnut stain was applied. Below center: One of
the rotten feet.
Now it was finally time
to to spray on some new lacquer. With no available photos of the
original finish or color, I had to improvise. I looked over several
radios with the original finishes, and decided on a color scheme. Using
Mowhawk brand toning lacquers, I coated the entire cabinet with "medium
brown Walnut", and then darkened certain areas with "extra dark
Walnut". Since I was restoring this in the middle of December, the
average temperate in my area is only in the 30's during the day. That
is not a good temperature to spray lacquers, but luckily there was one
Saturday that was up in the mid 40's, which was close enough for me.
Once the cabinet had been toned, several coats of clear lacquer were
applied.
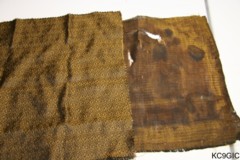
With the cabinet refinished, the only thing left was to replace the grill cloth. The original cloth was very dirty, and torn in several places, so it was not salvageable.A close match for a replacement was found at Radiodaze (part number GRC 40). This was installed to the original mounting board using some spray adhesive. Below center: the original and replacement grill cloths.
With the cabinet refinished, the only thing left was to replace the grill cloth. The original cloth was very dirty, and torn in several places, so it was not salvageable.A close match for a replacement was found at Radiodaze (part number GRC 40). This was installed to the original mounting board using some spray adhesive. Below center: the original and replacement grill cloths.