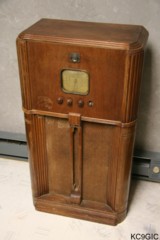
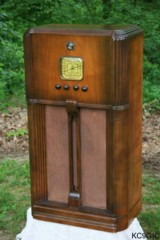
"Before" "After"
Brand: Delco by United
Motors Year Of
Manufacture: 1938 Frequency Range: 550-1600KC
Tube lineup: 5Y3G Rectifier, 6F6G Output, 6Q7G 1st Audio/AVC/2nd Det, 6K7 I.F. Amp, 6L7G 1st. Det, 6C5G Oscillator, 6G5G Tuning Eye
Schematic: Available here, courtesy of Nostalgia Air. Riders 9-27
Tube lineup: 5Y3G Rectifier, 6F6G Output, 6Q7G 1st Audio/AVC/2nd Det, 6K7 I.F. Amp, 6L7G 1st. Det, 6C5G Oscillator, 6G5G Tuning Eye
Schematic: Available here, courtesy of Nostalgia Air. Riders 9-27
This radio was purchased at the 2008 Fall IHRS meet in
Greenfield, Indiana. Like many of my acquisitions, the big question of
"why?" comes to mind. Obviously this one was mostly complete, but
riddled with water and insect damage. The price was right, but it would
easily be a costly and time consuming project.
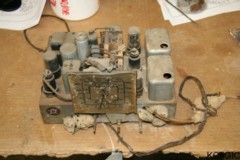
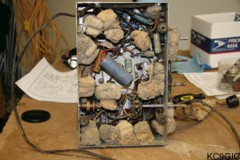
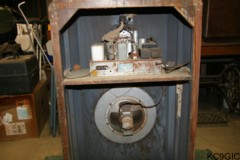
Upon disassembly, it was realized that the radio had been used as some sort of mud dauber metropolis. The top and bottom of the chassis were caked with hard-as-rock mud dauber nests. Below photos: The chassis and cabinet during disassembly, covered with mud dauber nests.
Upon disassembly, it was realized that the radio had been used as some sort of mud dauber metropolis. The top and bottom of the chassis were caked with hard-as-rock mud dauber nests. Below photos: The chassis and cabinet during disassembly, covered with mud dauber nests.
Electronic
restoration
would begin with a very thorough cleaning of the chassis.
Luckily, most of the old nests crumbled when tapped with a screwdriver.
After the mud dauber nests were removed and vacuumed up, the chassis
was
washed with
carburetor cleaner to remove the remaining mud and grease film.
Apparently this was a well used radio in it's former life, as most of
the components had been replaced at some point. The power transformer,
all of the tubes, the volume control, and most of the capacitors were
replacements.
Once the filter capacitors had been changed, the set was powered up on a metered variac/isolation transformer. Everything looked good at this point, now it was time to replace the rest of the paper capacitors. Once all the capacitors were replaced, the radio was making sounds, but there was allot of oscillation (squealing), and only a few strong stations could be received when the volume control was set to maximum. My first attempt to remedy the squealing was to check component lead and wire dressing. I also checked grounds and shields. Everything seemed good.
Since the squealing changed with the position of the volume control potentiometer, it was checked for continuity and resistance. The volume pot was found to be open. A new one from my parts supply that closely matched the size and specs was installed. The radio was now working as it should. An alignment was performed to improve on performance.
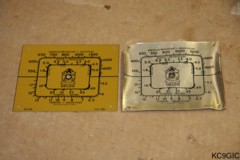
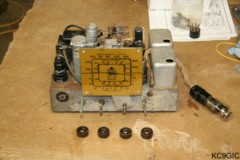
The dial scale would have to be replaced. The original was warped and faded due to water damage. Radiodaze carries a reproduction for this model, which was a perfect copy. One of the original knobs was also missing. A original was purchased from David Frush. Below Left: The reproduction and original dial scales, Right: The completed chassis.
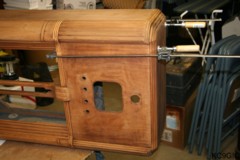
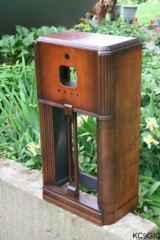
The cabinet would need several repairs, not to mention a complete refinish job. The cabinet had been refinished sometime in the past, and badly done. Citri-strip was used to remove the old finish. Once cleaned and dry, several joints and patches of veneer had to be reglued. Once the wood repairs were complete, Bartly's wood filler was applied. After drying overnight, the cabinet was sanded. Below Left: The top of the cabinet being reattached and glued, Right: Prior to grain filling.
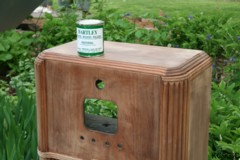
A new finish was built using Mohawk toning lacquers and Deft Gloss sprayed using a Critter spray gun. A new dial cover was made by using a custom mold made from 1/4 inch plywood, some .020" clear plastic sheeting, and a heat gun. The original grill cloth was decent, but faded. The reverse side lacked some of the designs of the front, but it was clean and retained it's original color. So the grill cloth was lightly vacuumed, removed and reversed. Below Center: The completed cabinet.
Once the filter capacitors had been changed, the set was powered up on a metered variac/isolation transformer. Everything looked good at this point, now it was time to replace the rest of the paper capacitors. Once all the capacitors were replaced, the radio was making sounds, but there was allot of oscillation (squealing), and only a few strong stations could be received when the volume control was set to maximum. My first attempt to remedy the squealing was to check component lead and wire dressing. I also checked grounds and shields. Everything seemed good.
Since the squealing changed with the position of the volume control potentiometer, it was checked for continuity and resistance. The volume pot was found to be open. A new one from my parts supply that closely matched the size and specs was installed. The radio was now working as it should. An alignment was performed to improve on performance.
The dial scale would have to be replaced. The original was warped and faded due to water damage. Radiodaze carries a reproduction for this model, which was a perfect copy. One of the original knobs was also missing. A original was purchased from David Frush. Below Left: The reproduction and original dial scales, Right: The completed chassis.
The cabinet would need several repairs, not to mention a complete refinish job. The cabinet had been refinished sometime in the past, and badly done. Citri-strip was used to remove the old finish. Once cleaned and dry, several joints and patches of veneer had to be reglued. Once the wood repairs were complete, Bartly's wood filler was applied. After drying overnight, the cabinet was sanded. Below Left: The top of the cabinet being reattached and glued, Right: Prior to grain filling.
A new finish was built using Mohawk toning lacquers and Deft Gloss sprayed using a Critter spray gun. A new dial cover was made by using a custom mold made from 1/4 inch plywood, some .020" clear plastic sheeting, and a heat gun. The original grill cloth was decent, but faded. The reverse side lacked some of the designs of the front, but it was clean and retained it's original color. So the grill cloth was lightly vacuumed, removed and reversed. Below Center: The completed cabinet.