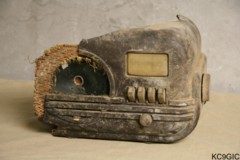
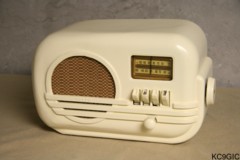
"Before" "After"
Brand: Delco by United
Motors Year Of
Manufacture: 1939 Frequency Range: 550-1600KC
Tube lineup: 35Z5GT Rectifier, 35L6GT Output, 12Q7GT 1st Audio/AVC/2nd Det, 12SK7 I.F. Amp, 12SA7 Converter
Schematic: Available here, courtesy of Nostalgia Air. Riders 11-3
Tube lineup: 35Z5GT Rectifier, 35L6GT Output, 12Q7GT 1st Audio/AVC/2nd Det, 12SK7 I.F. Amp, 12SA7 Converter
Schematic: Available here, courtesy of Nostalgia Air. Riders 11-3
The history of
this project began in Spring of 2007. Located deep within
Elizabeth, Indiana is a large farm owned by some family friends. While
doing some electrical work on the property, the family was cleaning out
some of the many, packed to the rafters, old buildings. This gem was
unearthed during that time. Upon first sight, my natural instinct to
restore this radio came to life. Never before had I attempted a project
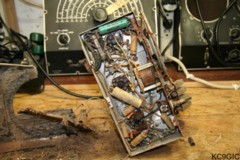
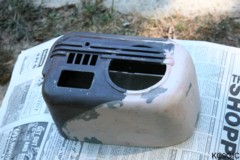
of this level, or should I say in this level of decay. Below two photos: Before disassembly.
The
wrath of time and the elements had taken their toll. Most
obvious damage was the cabinet, with over 60% missing, and the
remaining hulk riddled with cracks and chips. The chassis didn't look
much more appealing, being covered in rust and caked with dirt. While
most collectors would simply pluck the knobs or other salvageable parts
and trash the rest, that wouldn't do for me. This radio sat in
storage until August of 2007 when the final leg of it's story began,
with a trip to my workbench.
Electronic Restoration
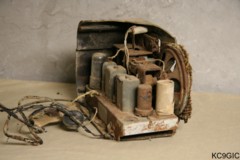
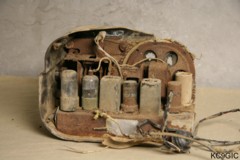
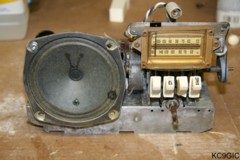
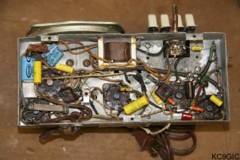
With the extent of water damage on the chassis, the best option was a complete tear down and rebuild. Below two photos: The chassis before restoration.

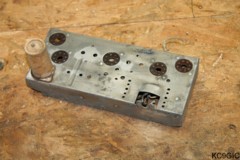
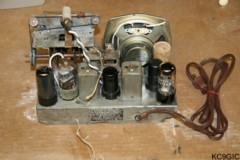
Each component was removed, cleaned, tested, and then labeled for reassembly. The radio was broken down to three main sections, the chassis, tuning condenser, and speaker. Next came the removal of rust and other corrosion. Navel jelly and brass wire brushes had the chassis looking much better. Below left: Parts removed for cleaning and testing, Right: The cleaned chassis.
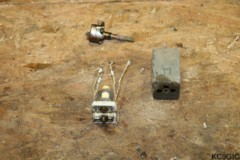
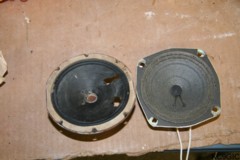
Once the parts were all cleaned and tested, it was time for reassembly. A standard restoration approach was now taken. All capacitors were changed, and a new power cord was installed. Much of the wiring had damaged insulation, so it was replaced using modern cloth covered wiring. Other parts like the I.F. transformers, potentiometer, and different trimmer capacitors had to be complete disassembled and cleaned. While most of the irreplaceable parts were salvageable, the original PM speaker was not. A modern replacement of similar dimensions and coil rating was used. The final step included replacing most of the tubes, as the original were damaged. Below center: The original (left) and replacement (right) speakers.
Electronic Restoration
With the extent of water damage on the chassis, the best option was a complete tear down and rebuild. Below two photos: The chassis before restoration.
Each component was removed, cleaned, tested, and then labeled for reassembly. The radio was broken down to three main sections, the chassis, tuning condenser, and speaker. Next came the removal of rust and other corrosion. Navel jelly and brass wire brushes had the chassis looking much better. Below left: Parts removed for cleaning and testing, Right: The cleaned chassis.
Once the parts were all cleaned and tested, it was time for reassembly. A standard restoration approach was now taken. All capacitors were changed, and a new power cord was installed. Much of the wiring had damaged insulation, so it was replaced using modern cloth covered wiring. Other parts like the I.F. transformers, potentiometer, and different trimmer capacitors had to be complete disassembled and cleaned. While most of the irreplaceable parts were salvageable, the original PM speaker was not. A modern replacement of similar dimensions and coil rating was used. The final step included replacing most of the tubes, as the original were damaged. Below center: The original (left) and replacement (right) speakers.
Once everything was
reassembled and double checked, the big moment had arrived, time to
throw some power on this thing. Power was applied using a metered
variac and an isolation transformer. With full power applied, some
sounds were coming from the speaker, but many adjustments were still
needed before any reasonable results could be obtained. After an
alignment, and some repairs to the tuning condenser, several weak
stations were coming in. The original loop antenna was missing, so once
a new antenna was rigged up, the radio was playing to my
satisfaction.
A few minor repairs remained at this point. The dial pointer was too badly deteriorated to use, so a replacement was purchased from Play Things Of Past. Somehow the dial scale and dial cover survived, and only required some minor cleaning. Below photos: the completed chassis.
A few minor repairs remained at this point. The dial pointer was too badly deteriorated to use, so a replacement was purchased from Play Things Of Past. Somehow the dial scale and dial cover survived, and only required some minor cleaning. Below photos: the completed chassis.
Cabinet
Restoration
Despite the rather straight forward electronic restoration, the cabinet would be no walk in the park. Never having personally repaired any Bakelite cabinets to this extent, new ideas would have to be utilized for success. The first step was a thorough cleaning, removing all dirt and grease/oils that would interfere with the rebuilding.
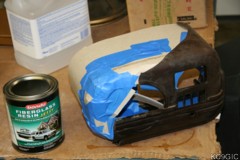
In the past Bondo has been used to repair broken plastic parts, so why couldn't some sort of Bondo be used to replace the better half of a cabinet? Browsing the local stores, a fiberglass resin jelly by Bondo was selected to build the framework. Cardboard and masking tape was used to build a form for the Bondo. Below left: A form using cardboard, Right: The first layer after drying.
Despite the rather straight forward electronic restoration, the cabinet would be no walk in the park. Never having personally repaired any Bakelite cabinets to this extent, new ideas would have to be utilized for success. The first step was a thorough cleaning, removing all dirt and grease/oils that would interfere with the rebuilding.
In the past Bondo has been used to repair broken plastic parts, so why couldn't some sort of Bondo be used to replace the better half of a cabinet? Browsing the local stores, a fiberglass resin jelly by Bondo was selected to build the framework. Cardboard and masking tape was used to build a form for the Bondo. Below left: A form using cardboard, Right: The first layer after drying.
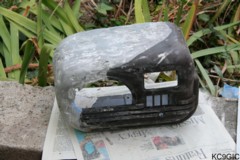
Once
the fiberglass resin had dried overnight, it was sanded to shape using
60 grit sandpaper. Now a layer of red "body filler" Bondo was applied,
giving a much smoother result. Once this was sanded to shape, several
small pores and cracks were still visible, so some automotive glazing
putty was used to achieve an even smoother surface. Below center: The last layer of Bondo and
glazing putty after being sanded.
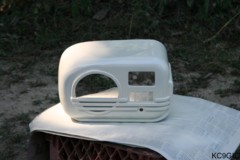
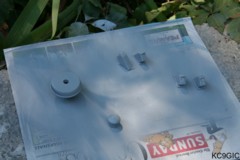
Not this was starting to look like a radio again! To strengthen where the Bondo attached to the existing Bakelite, a bead of super glue was ran down the joints. After a good cleaning, a few coats of gray primer were sprayed on, followed by a coat of Rustoleum Antique White paint. A simular approach was used on the knobs and pushbuttons. Below Left: The painted cabinet, Right: The knobs and pushbuttons ready to be painted.
After a few more layers of paint followed by sanding with 800 grit paper, it was time for a clear coat. Some gloss clear lacquer seemed to work out good. At this point the last remaining task was the grill cloth. Luckily a small piece of the original remained, and was matched up to some modern reproduction cloth.
While the Delco is now functioning and in a much more presentable condition, it is still lacking a few things. The pushbuttons will someday have reproduction station call letters in them. A suitable back cover also needs to be located. So in the meantime, this radio will mostly likely be a static display, a good reminder of the crazy projects I take on in the quest of radio restoration.
Back To Collection
Back to Homepage
© Copyright 2007 "Jeremy's Antique Radios"