
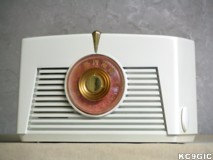
"Before" "After"
Brand: Radio Corporation of America Year of Manufacture: 1949 Frequency Range: 550 - 1600 Kc
Tube Lineup: 50L6 GT Output, 35Z5 GT Rectifier, 12SQ7 2nd Det/A.F. Amp/AVC, 12SK7 I.F. Amp, 12SA7 1st Det/Osc.
Schematic: Available here, courtesy of Nostalgia Air. Riders 18-45
This was a gift during my high school graduation in 2004. The cabinet was stained, and had a nasty layer of grime on it. The original label on the bottom is mostly intact, but the model number was gone. Luckily on page # 117 of the 4th Edition Guide to Antique Radios, there is a photo of this radio.
For anyone who has watched "That 70"s Show " on the Fox network, may have noticed that they used this same model radio as a background prop in the basement scenes. However, in a newer episode in May 2005, I noticed the radio was gone.
Electronic Restoration
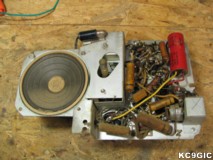
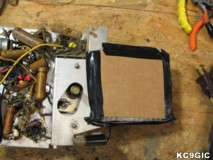
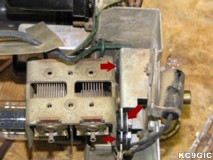
The electronic restoration started off with the usual routine: disassembly, cleaning with a vacuum, and inspection. Below left: The chassis after dissassembly, Right: The speaker cone covered with cardboard to prevent damage during restoration.
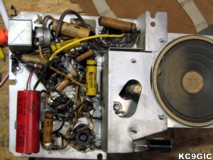
When it comes to restuffing capacitors, many collectors only use this method for the rare or valuable radios. I have started using this on most radios I recap. Sure it takes a little extra time, but the end result looks very close to original. The recapped chassis can be seen in the below left photo. After this process was complete, I powered the radio up, making sure to use a isolation transformer, and observing amperage draw. Everything sounded pretty good, then there was a loud pop, and the radio went quiet. It sounded like a bad connection, or short to me. I started tapping components with a plastic stick while the radio was powered up. When I got to the tuning capacitor, I found the problem. The rubber spacers used to insulate the capacitor from the chassis had crumbled away. This was fixed by removing the capacitor, cleaning off the old rubber, and installing new rubber spacers. Below left: The recapped chassis, Right: The bad rubber gromets.
Cabinet Restoration
As you can see in the before photo, located at the top of this page, this radio badly needed a repainting. I started off by cleaning the cabinet in a sink with some dish soap and water, taking care to mask off the paper label. This removed the dirt and grease. Since the paint chips were not that large, just numerous, I decided to try sanding down the cabinet, and painting over the existing coat without stripping. I used some 800 grit wet/dry paper to smooth out the chips. I then sprayed on three coats of Rust-Oleum brand gray primer, allowing 24 hours for this to dry, I sanded once again with 800 grit paper, then sprayed on about four coats of Krylon brand ivory gloss paint. After this had dried overnight, I lightly sanded with 1500 grit wet/dry paper to achieve a smooth, gloss finish.
I used some brass polish to clean the metal pointer and dial center. The red foil backing behind the dial fell apart after I disassembled the radio, so I found a surviving piece, scanned it, and printed out a new pattern to use, which is a little brighter than the old, but it doesn't look bad.