Brand: Radio Corporation of America Year of Manufacture: 1938 Frequency Range(s): 550-1600 KC, 2.3-7 & 7-22 MC
Tube Lineup: 5T4 Rectifier, 6F6 X 2 PP Output, 6Q7 2nd Det/AVC/A.F., 6F5 Inverter, 6K7 I.F., 6A8 1st Det, 6J7 Osc, 6U5 Indicator
Schematic: Available here, courtesy of Nostalgia Air. Riders 9-117
Tube Lineup: 5T4 Rectifier, 6F6 X 2 PP Output, 6Q7 2nd Det/AVC/A.F., 6F5 Inverter, 6K7 I.F., 6A8 1st Det, 6J7 Osc, 6U5 Indicator
Schematic: Available here, courtesy of Nostalgia Air. Riders 9-117
In
March of 2007, a family friend told me about a radio for sale in
this
small inconspicuous shop
a few miles north. At the time, like usual, my bench was full and the
radio room couldn't spare the space for another console. About a month
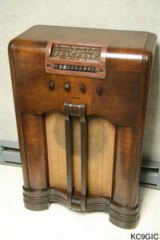
later I finally made a trip to the shop, and found the radio to be this
RCA
99K. Don't quite know why I bought this one. Perhaps it was the price,
at a little over $100, maybe the good looking original condition,
and the well built 9-tube chassis with a tuning eye and motorized
tuning.
I ended up packing this one into the bed of my Ford Ranger, wrapping it in a tarp due to the rain, and taking it home. This mighty RCA patiently awaited restoration in the corner of my radio room until December of 2007. This looked to be a easy restoration. The original finish was intact, and the cabinet had no damage. The grill cloth was rather faded, but in good enough shape to keep. The pushbuttons were completely deteriorated, and the escutcheon was warped and cracked.
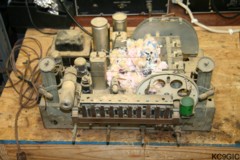
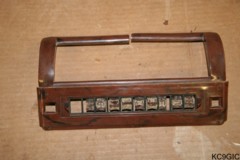
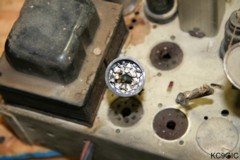
I feared the worse for the chassis. Upon removal from the cabinet, a large mouse nest was found right in the middle of the top. Below Left & Center: The chassis before cleaning (the electronic tuning is the arch on the left chassis in the center photo), Right: The broken escutcheon and bad pushbuttons.

I ended up packing this one into the bed of my Ford Ranger, wrapping it in a tarp due to the rain, and taking it home. This mighty RCA patiently awaited restoration in the corner of my radio room until December of 2007. This looked to be a easy restoration. The original finish was intact, and the cabinet had no damage. The grill cloth was rather faded, but in good enough shape to keep. The pushbuttons were completely deteriorated, and the escutcheon was warped and cracked.
I feared the worse for the chassis. Upon removal from the cabinet, a large mouse nest was found right in the middle of the top. Below Left & Center: The chassis before cleaning (the electronic tuning is the arch on the left chassis in the center photo), Right: The broken escutcheon and bad pushbuttons.
After
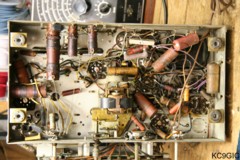
a good cleaning of the chassis, the damage wasn't as bad as first
expected. This radio had obviously seen some heavy use in it's time, as
many repairs had been performed in the past. Many of the components
were not original. Below Center: The
bottom of the chassis before restoration.
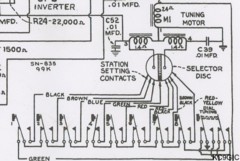
Once the chassis was repaired and aligned, everything was working good. The motor for the electronic tuning was spinning in the opposite direction, never could figure out why. Swapping the leads to the windings fixed the problem. The electronic tuning on this radio is absolutely amazing. It is adjusted by tuning in a station manually, then moving a contact on the back of the arch looking assembly with slots until the pilot light goes out (pilot goes out when the contact is over the insulating line). The arch hides a disc that is made up of two half circle brass plates, with a insulated strip in between them, the insulated strip is about a 1/16th wide. The whole disc assembly is attached to the tuning capacitor, and driven by a motor and gears. The motor is disconnected from the tuning capacitor until energized, when a centrifugal gear engages.
When a button is pressed for a station, the motor will energize and the direction of the rotation will depend on which plate the contact is on. The motor will rotate until the disc spins and hits the insulated strip/line. Below Left: A schematic of the electronic tuning, Right: An illustration of the tuning mechanism.

Restoration
of the chassis included replacing all capacitors, replacing
the Candohm resistor, replacing many damaged wires (specifically to the
speaker and eye tube socket), and replacing the power cord. The 1
meg-ohm resistor in the eye tube socket was out of tolerance, so it had
to be replaced. To get the socket apart, a small screwdriver was used
to push out the cover on the front of the socket. This was done by
pushing in the screwdriver on the rear of the socket where the wires
enter the socket assembly, a few light taps with a hammer had it apart.
Once reassembled, a small spot of super glue held the cover in place. Below Center: The resistor hidden in the
eye tube socket.
Once the chassis was repaired and aligned, everything was working good. The motor for the electronic tuning was spinning in the opposite direction, never could figure out why. Swapping the leads to the windings fixed the problem. The electronic tuning on this radio is absolutely amazing. It is adjusted by tuning in a station manually, then moving a contact on the back of the arch looking assembly with slots until the pilot light goes out (pilot goes out when the contact is over the insulating line). The arch hides a disc that is made up of two half circle brass plates, with a insulated strip in between them, the insulated strip is about a 1/16th wide. The whole disc assembly is attached to the tuning capacitor, and driven by a motor and gears. The motor is disconnected from the tuning capacitor until energized, when a centrifugal gear engages.
When a button is pressed for a station, the motor will energize and the direction of the rotation will depend on which plate the contact is on. The motor will rotate until the disc spins and hits the insulated strip/line. Below Left: A schematic of the electronic tuning, Right: An illustration of the tuning mechanism.
With the chassis working to satisfaction, it was time to focus on the cabinet. Since the original finish was intact and well preserved, it would be touched up. The whole cabinet was cleaned with a scrubbing pad and mineral spirits. Once clean and dry, the cabinet was wiped down with special walnut colored stain. The stain soaks into the scratches/chips, and blends them in with the rest of the finish. After a few minuets, the stain was wiped off. The whole cabinet was then sprayed with a few light coats of lacquer to seal in the original finish.
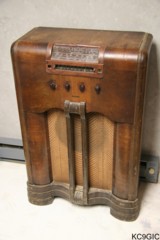
Next came replacing the escutcheon and pushbuttons. The reproduction pushbuttons were purchased from Ed Shultz at Renovated Radios. Finding a replacement escutcheon would be somewhat difficult. While Ed nor anyone else reproduces that part, Ed did point me to a store that listed a model 99K that was being parted out. A few weeks after I sent my inquiry to 8 Track Shack, I had my replacement escutcheon. Below Center: The 99K before restoration.
Back to Collection
Back to Homepage
© Copyright 2008 "Jeremy's Antique Radios"