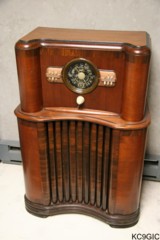
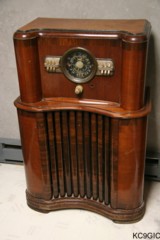
Brand: Zenith Radio
Corp. Year Of
Manufacture: 1939 Frequency Range(s): 550-1600KC, 1.6-5.0MC, 6-18MC
Tube lineup: 6X5G Rectifier, 6F6G Output, 6F5G Amp, 6J5G Detector, 6K7G I.F. 6A8G Converter, 1232 R.F., 6U5 Indicator
Schematic: Available here, courtesy of Nostalgia Air. Riders 11.23
Tube lineup: 6X5G Rectifier, 6F6G Output, 6F5G Amp, 6J5G Detector, 6K7G I.F. 6A8G Converter, 1232 R.F., 6U5 Indicator
Schematic: Available here, courtesy of Nostalgia Air. Riders 11.23
A
gift in 2001...or was it 2002? Anyways, a co-worker of my dad had this
radio, and decided to give it to me. While it was working when first
acquired, soon it took a turn for the worse. The 6X5 rectifier, which
is
known for developing internal shorts, well, shorted out. Luckily I was
nearby when the transformer began to sizzle, so damage was kept to a
minimum.
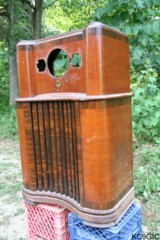
This Zenith had experienced a well used life. The chassis had been repaired and worked on many times over the years, and a few modifications were present. Most noticeably was the missing band selector lever. Someone had removed the whole band switch linkage and drilled a hole in the front of the cabinet to directly access the switch. Replacing the missing parts would later be the most challenging aspect of this project. Below center: Before restoration.
Electronic Restoration
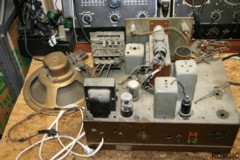
The paint on the chassis was gone in several places. So the chassis was repainted using "Hammer tone"type spray paint, the same color as the original. While replacing the wiring going to the eye tube socket, the 1 mega-ohm resistor in the socket was replaced, as it is commonly out of tolerance or open, causing the eye tube not to function properly. A fuse was also added on the secondary of the transformer, to help prevent damage in case of another tube failure. Once everything was back together, the radio was working, but not that well. After a few minor problems were fixed, and the receiver was aligned, the radio was working and sounding great. Below center: The chassis after restoration.
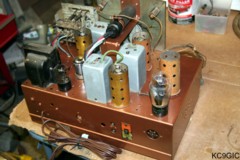
This Zenith had experienced a well used life. The chassis had been repaired and worked on many times over the years, and a few modifications were present. Most noticeably was the missing band selector lever. Someone had removed the whole band switch linkage and drilled a hole in the front of the cabinet to directly access the switch. Replacing the missing parts would later be the most challenging aspect of this project. Below center: Before restoration.
Electronic Restoration
Despite my best attempts in 2002,
the
radio could never be repaired working condition. After the rectifier
had shorted, several other parts went out in the process, including a
candohm resistor and the electrolytic capacitors. The second attempt to
repair this radio included a complete chassis restoration and rebuild.
Besides replacing all of the paper capacitors and restuffing the
replacements into the orange Zenith brand original capacitors, the
electrolytics were replaced, and much of the original wiring had to be
replaced due to bad insulation. Below
center:
The chassis before restoration.
The paint on the chassis was gone in several places. So the chassis was repainted using "Hammer tone"type spray paint, the same color as the original. While replacing the wiring going to the eye tube socket, the 1 mega-ohm resistor in the socket was replaced, as it is commonly out of tolerance or open, causing the eye tube not to function properly. A fuse was also added on the secondary of the transformer, to help prevent damage in case of another tube failure. Once everything was back together, the radio was working, but not that well. After a few minor problems were fixed, and the receiver was aligned, the radio was working and sounding great. Below center: The chassis after restoration.
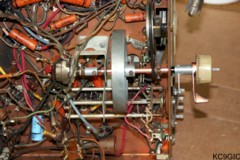
With
the radio working, attention was now focused to rebuilding the band
selector and tuning assembly. Inquiring online yielded no results. In
September 2007, with most of my parts suppliers exhausted, I contacted John Goller, a well known
radio restorer and collector. John has restored many, many Zeniths in
the past, and I figured at the least he could give me an insight as to
what parts I needed to complete my radio. Well, John was able to help
me, he even sent me the missing parts that I needed, with the exception
of the band selector lever and the collar that fits over the shaft,
which were purchased from RadioDaze.
The
original tubing that the whole tuning assembly attached to was
broken in several places. Some 1/4" copper water pipe was used to
replace this. Below center: The
rebuilt tuning assembly.
Cabinet Restoration
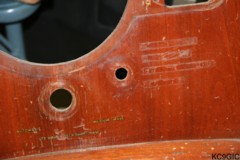
About the only good thing on this radio was that the original finish was intact and well preserved. The main problem was a hole drilled in the front of the cabinet. This was fixed by filling in the hole with wood filler, and then sanding it down. To blend in the repair, wood grain was drawn in, and the spot was toned to the correct color. Below center: The hole drilled in the cabinet.
The only place that had to be refinished was the solid wood bottom of the cabinet, which originally used a dark colored finish. Some extra dark walnut toner was used, followed by a few coats of semi gloss lacquer. The rest of the cabinet was thoroughly cleaned with mineral spirits and a scrubbing pad. It was then wiped down with some dark walnut stain to blend in the bad areas. A few coats of semi gloss lacquer were then applied. Below center: The cabinet after being cleaned.
The original knobs were warped and cracked. Reproduction knobs were purchased from Old Time Replications. The paint on the pushbutton assemblies was almost completely gone. Several different colors of paint was used to achieve a new finish. A base color was used, then a few colors like copper and silver were over sprayed on, creating a speckled effect.
Back to Collection
Back to Homepage
© Copyright 2007 "Jeremy's Antique Radios"