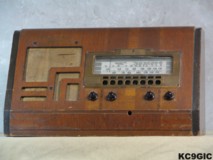
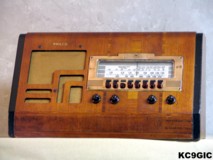
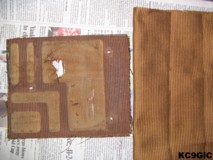
"Before" "After"
Brand: Philco Radio & Telev. Corp. Year Of Manufacture: 1939 Frequency Range(s): 540 - 1600KC, 1.6 - 3.3 MC
Tube lineup: 84 Rectifier, 41 Output, 75 1st Audio, 37 2nd Det/AVC, 78 I.F., 6A8 Det/Osc
Schematic: Available here, courtesy of Nostalgia Air. Riders 10-18
This one was purchased at a CARS meet in Florence , Kentucky in June of 2002. The price was rather cheap at only $15. This radio, along with my Philco 42-PT95 and RCA 25-BT2 followed me home from that meet.
The condition of this radio was not quite "basket case" or "parts set" yet, but it was close. Not much was original on it. Someone had refinished the cabinet in the past, luckily with lacquer, but the finish didn't look that good after years of neglect and abuse. The cabinet also had several holes drilled in it, the largest and most noticeable was a 3/8" hole directly below the dial on the front panel. The dial cover and knobs had also been replaced. The plastic pushbutton tips were gone, but this was no surprise, since few original examples of these ever survive. And finally to top things off, the grill cloth was raged and torn.
Now for the good part, the electronics were complete and in rather good condition. Unfortunately, this radio had to sit for a little over three years to be restored.
Electronic Restoration
When the chassis was removed prior to the restoration in 2005, I was surprised to find that the radio had already been recapped, and the capacitors had already been restuffed into the shell's of the originals. This must have been done shorty after purchase, but forgotten about over the years, talk about a good surprise for a change. With that out of the way, all that was left was to clean and lubricate the moving parts and switches, and give it a good alignment, which it really didn't need.
The only necessary electrical repairs this time around was the replacement of some deteriorated rubber coated wiring, which was replaced using modern cloth covered wire.
Cabinet Restoration
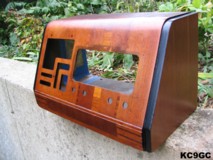
I started off by cleaning off the cabinet with some mineral spirits to remove the usual greasy dust. This revealed a lacquer finish that needed to be removed. I used CitriStrip brand stripper to strip the finish off. This stuff worked quite well, and only took off one layer at a time. After this was accomplished, I had to tackle several other problems with the cabinet. As you can see in the above "Before" photo, there was a large hole drilled in the front panel, along with some smaller ones on the top. I filled these in, along with several small veneer chips with some Minwax stainable wood filler.
After the wood filler had dried overnight, I started sanding the cabinet with some 220 grit paper, moving up to 400. Next came applying the new finish. I sprayed on a few base coats of lacquer which helped show the places that needed to be toned to match the rest of the cabinet. I used Mowhawk medium brown walnut colored toner to help blend in the wood filler, I then gave the whole cabinet a few coats to slightly darken it. To tone the two dark strips on each side of the front panel, and the inside of the grill, I used some black toning lacquer. I finished up by spraying on several coats of Deft Semi Gloss lacquer. Below: The cabinet after refinishing.

With the radio nearing completion, I still had several things to do. The original pushbuttons on this radio, which are notorious for deteriorating and crumbling away, were missing. I purchased some very nice reproductions from Larry Bordonaro at Old Time Replications. To get the new pushbutton tips to work correctly, I had to slightly grind down the bottom corner on each one so they wouldn't rub the chassis, I also had to use some silicone to glue them to the pushbutton assembly shafts. With that out of the way, I cleaned the escutcheon with some metal cleaner. This removed the several paint specks, green corrosion, and discolored parts. After this process was complete, I coated it with some clear lacquer. I also added a reproduction "Philco" Decal where the original use to be. This was purchased from Rock Sea Enterprises. I sprayed on a few coats of clear lacquer on top of this to protect it.
Last but not least, I had to do something with the dial cover, which looked pretty miserable. Not having a correct replacement on hand, I made one from some clear plexiglass, and held it in place with a little bit of clear silicone. It looks ok, But I may try to find a better reproduction sometime in the future.