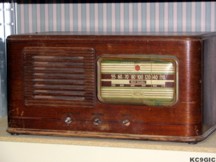
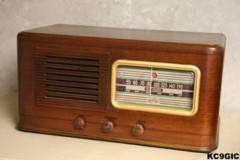
"Before" "After"
Brand: Radio Corporation of America
Year of Manufacture: 1942 Frequency Range: 550 - 1600 Kc
Tube Lineup: 3Q5 GT Output, 1H5 GT 2nd Det/A.F. Amp/AVC, 1N5 GT I.F. Amp, 1A7 GT 1st Det/Osc, 1N5 GT R.F.
Schematic: Available here, courtesy of Nostalgia Air. Riders 13-20, 14-69
Tube Lineup: 3Q5 GT Output, 1H5 GT 2nd Det/A.F. Amp/AVC, 1N5 GT I.F. Amp, 1A7 GT 1st Det/Osc, 1N5 GT R.F.
Schematic: Available here, courtesy of Nostalgia Air. Riders 13-20, 14-69
This radio was purchased along with a Philco 42-PT95 and 39-30 at the CARS swap meet in June of 2002. At the time my criteria for buying radios was simple, they had to be cheap! Being young and on a tight budget, this one was a deal at only $5.00.
The condition was another story. Besides the missing knobs, several of the tubes were broken, and the whole radio looked like it had been exposed to moisture at some time. As seen in the above "Before"photo, the original finish is mostly intact, but very spotty. No veneer damage luckily. The dial cover is cracked and badly warped, and the bezel is covered in spots of green corrosion. Other than those few things, this looks like an easy project.
Electrical Restoration
The first repairs on the chassis began back in 2002. Several of the tubes were damaged, so they had to be replaced. This is a battery type radio, which requires 1.5 volts DC for A+, and 90 volts DC for B+. The radio came with some sort of battery eliminator, very similar in design to the RCA CV-42 battery eliminator. I never could get it to work properly, so this radio sat on a shelf for four years.
In September 2006, it was this ones turn on the bench. Other than a few caps that had been replaced in 2002, the chassis was almost completely original. The first order of business was building a power supply. A few years ago I used a battery eliminator design on Phil's Old Radios to power another radio, so the same design was used for this radio, with the addition of a fuse and a small Isolation transformer. The A+ voltage was supplied using a D cell type battery. When the eliminator was built, a single throw three pole switch was used so both the A and B power supplies could be switched.
To my surprise, the radio worked fairly well on the first power up. Now the capacitors could be replaced. To keep the chassis looking original, all of the capacitors were restuffed. Each capacitor was replaced one at a time, and the radio was tested after each replacement. This is a good method to use, so if a mistake is made, you won't have to retrace you work very far back to find the problem.
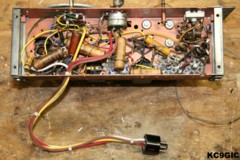
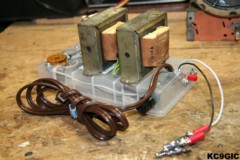
This radio used rubber coated wires throughout the chassis. This type of wire is very prone to dry rotting, and the insulation simply crumbles away if it is moved or touched in any way. Using modern wire of the same size and color, most of the original wiring was painstakingly replaced, taking the time to route the new wires in the same way as the originals. The final steps included cleaning and lubricating the controls and the tuning capacitor. Below left: The restored chassis with new wiring and restuffed capacitors. Right: The battery eliminator built from spare parts.
Cosmetic Restoration
The cabinet had no major damage, but the original finish looked bad. The first order of business was to clean the cabinet. Wearing rubber gloves, mineral spirits and a 3M brand scrubbing pad were used to remove loose lacquer and years worth of dirt and grease. Since the original finish was mostly intact, it would be saved. To blend in the many chips and scratches, the whole cabinet was wiped down with special walnut colored stain. After a few minutes, the excess stain was removed. This method worked well except on the bottom trim, which originally used a dark colored toning lacquer to blend in the lighter colored wood. To fix this, remaining lacquer was removed, the rest of the cabinet was masked off, and some walnut colored Mowhawk brand toning lacquer was spayed on. The final step was a light sanding, followed by several coats of Deft brand semi gloss clear lacquer over the whole cabinet.
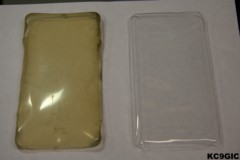
Like many radios of it era, the clear plastic dial cover was discolored, warped, and cracked. To make a new cover, materials available in a kit available from Bill Turner were used. The escutcheon was another can of worms. It was covered in some sort of green corrosion. I tried to lightly remove this, and polish with some Brasso, but the golden colored plating simply flaked off. As a last resort, it was painted. A few coats of gold colored spray paint followed by some clear gloss lacquer did the trick. The white colored dial pointer was also corroded. It was cleaned and repainted white. Below: The original and reproduction dial covers.
The only thing remaining at this point were
the missing knobs. I inquired online about some originals with no luck.
A matching set found in my parts drawer will work in the meantime.
Final
Thoughts
While not being the most spectacular radio I own, it does perform quite well, and has an attractive looking cabinet design. The costs were kept generally low, at around $30.00. The original knobs will be the toughest challenge, since they seem to be hard to track down.
While not being the most spectacular radio I own, it does perform quite well, and has an attractive looking cabinet design. The costs were kept generally low, at around $30.00. The original knobs will be the toughest challenge, since they seem to be hard to track down.