
"Before" "After"
Brand: Philco Radio &
Telev. Corp. Year Of Manufacture: 1935 Frequency Range(s): 540 - 1750KC, 4.2 - 12.0 MC
Tube lineup: 80 Rectifier, (2X) 42 PP Output, 42 Driver, 75 2nd Det/1st I.F., 78 I.F., 6A7 1St Det/Osc, 78 R.F.
Schematic: Available here, courtesy of Nostalgia Air. Philco model 118 ( US Version ).
In January 2006, Ron Ramirez of Philcoradio.com, was downsizing his collection, and his items for sale would be listed on ebay. Browsing though his listings, several of the radios had a certain appeal to me, sort of like a moth flying into a bright light....ZAP! Dang the luck, I ended buying this radio, a Philco 59C, and a Philco 38-116. So I spent a nice frigid February day making the two hour drive to Evansville to pick them up.
As for the condition, this one was past being a parts set since someone had already parted it out! When the radio was picked up, it was in the exact condition that Ron had used to describe it, bad! Most noticeably were the missing parts, which included the speaker/output transformer, shadow meter, all of the tubes, tube shields, knobs, and the grill cloth backing. Damage included several holes drill on the front panel, chassis rust, and the original finish was beyond salvage. A little bit of research revealed that this was an export model, and was only sold in Canada, which makes it quite rare in the United States. The chassis is the same as a US model 118.
Despite the drawbacks and advice from other collectors, this radio was going to receive a full restoration, using whatever means and resources it took to do it correctly. Below center: A rear view of the radio before restoration.

Electronic Restoration
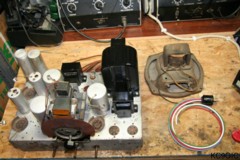
The first steps to take on a project like this was track down the missing parts. The missing shadow meter was going to be a tough one. I sent an inquiry to Play Things Of Past about the missing parts. As luck would have it, they had the exact original shadow meter for this radio, so I had that and the tubes out of the way. The next task was to find a speaker. I tried several sources to no avail. By another batch of luck, Mark Oppat had a original Philco speaker in stock, of the same dimensions and field coil size. That left the audio output transformer, which was replaced using a Hammond 125 series universal push pull type, available from Radiodaze.
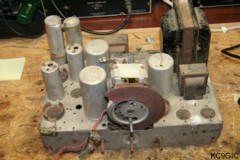
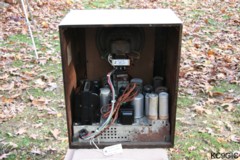
With those out of the way, it was time to begin repairs. The chassis was covered in dust, with a tad bit of rust mixed in. Using a vacuum and a brush, the loose dirt was cleaned off. The rest of the chassis looked ok, but rusted transformers stuck out pretty bad. They were lightly sanded, and repainted black with a clear coat of lacquer. Below two photos: The chassis before restoration began.
With a schematic on hand, it was time to dig into the electronics. The first things to be replaced were the electrolytic capacitors, and a new cloth covered cord was installed. While replacing the cord, a 1 amp fuse was installed on the hot lead for protection. At this time the shadow meter was also rewired into the circuit. The radio was then carefully powered up. I could hear a slight buzz, but the radio was for the most part dead. It was verified in the first power up that the power supply and audio output sections were working, so it was time to replace the remaining capacitors. This radio uses several of the capacitors enclosed in Bakelite type blocks, and sealed with a black tar like substance. These too had to be replaced. The Bakelite blocks were heated using a heat gun, the tar and old capacitors were removed, and modern replacements were installed inside of the blocks. There were a few tubular type capacitors, which were restuffed to maintain the original appearance. Several resistors along the way were found to out of tolerance, so they were replaced with modern carbon types.
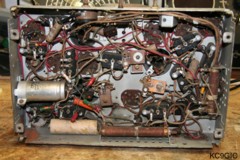
To minimize potential mistakes, the radio was retested after each capacitor replacement. When there was only one Bakelite block to restuff, the radio was still for the most part dead, not a good thing! After the final capacitor was replaced, it sprang to life with clear reception and loud volume, go figure! The rubber grommets that the tuning capacitor mount to were completely gone. There were reproduced using some junk rubber parts from my parts bin. Next a wiring harness and plug were made for the speaker. The speaker plug on the back of the chassis was the same configuration as four pin type tubes, and luckily I had a four pin plug in my parts stock to use. Below center: The repaired chassis and replacement speaker.
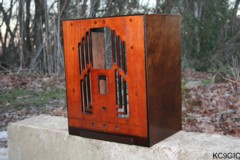
While the radio was working quite well, the shadower meter was not. I was able to get a decent shadow by adjusting the lamp mounted on the back of the unit. Even with a strong signal, the movement was not very much. A little bit of reading revealed that a bad shunt resistor could be the cause. Wait a minuet...The original shunt resistor had been cut out of the circuit in my radio! My radio required a 2900 ohm replacement. Once this was wired in, the shadow meter was working good. The final step was an alignment, which made the meter work even better. Below center: The completed radio installed in the cabinet in fall 2009 after repairs, over two years after the initial restoration.
Tube lineup: 80 Rectifier, (2X) 42 PP Output, 42 Driver, 75 2nd Det/1st I.F., 78 I.F., 6A7 1St Det/Osc, 78 R.F.
Schematic: Available here, courtesy of Nostalgia Air. Philco model 118 ( US Version ).
In January 2006, Ron Ramirez of Philcoradio.com, was downsizing his collection, and his items for sale would be listed on ebay. Browsing though his listings, several of the radios had a certain appeal to me, sort of like a moth flying into a bright light....ZAP! Dang the luck, I ended buying this radio, a Philco 59C, and a Philco 38-116. So I spent a nice frigid February day making the two hour drive to Evansville to pick them up.
As for the condition, this one was past being a parts set since someone had already parted it out! When the radio was picked up, it was in the exact condition that Ron had used to describe it, bad! Most noticeably were the missing parts, which included the speaker/output transformer, shadow meter, all of the tubes, tube shields, knobs, and the grill cloth backing. Damage included several holes drill on the front panel, chassis rust, and the original finish was beyond salvage. A little bit of research revealed that this was an export model, and was only sold in Canada, which makes it quite rare in the United States. The chassis is the same as a US model 118.
Despite the drawbacks and advice from other collectors, this radio was going to receive a full restoration, using whatever means and resources it took to do it correctly. Below center: A rear view of the radio before restoration.
Electronic Restoration
The first steps to take on a project like this was track down the missing parts. The missing shadow meter was going to be a tough one. I sent an inquiry to Play Things Of Past about the missing parts. As luck would have it, they had the exact original shadow meter for this radio, so I had that and the tubes out of the way. The next task was to find a speaker. I tried several sources to no avail. By another batch of luck, Mark Oppat had a original Philco speaker in stock, of the same dimensions and field coil size. That left the audio output transformer, which was replaced using a Hammond 125 series universal push pull type, available from Radiodaze.
With those out of the way, it was time to begin repairs. The chassis was covered in dust, with a tad bit of rust mixed in. Using a vacuum and a brush, the loose dirt was cleaned off. The rest of the chassis looked ok, but rusted transformers stuck out pretty bad. They were lightly sanded, and repainted black with a clear coat of lacquer. Below two photos: The chassis before restoration began.
With a schematic on hand, it was time to dig into the electronics. The first things to be replaced were the electrolytic capacitors, and a new cloth covered cord was installed. While replacing the cord, a 1 amp fuse was installed on the hot lead for protection. At this time the shadow meter was also rewired into the circuit. The radio was then carefully powered up. I could hear a slight buzz, but the radio was for the most part dead. It was verified in the first power up that the power supply and audio output sections were working, so it was time to replace the remaining capacitors. This radio uses several of the capacitors enclosed in Bakelite type blocks, and sealed with a black tar like substance. These too had to be replaced. The Bakelite blocks were heated using a heat gun, the tar and old capacitors were removed, and modern replacements were installed inside of the blocks. There were a few tubular type capacitors, which were restuffed to maintain the original appearance. Several resistors along the way were found to out of tolerance, so they were replaced with modern carbon types.
To minimize potential mistakes, the radio was retested after each capacitor replacement. When there was only one Bakelite block to restuff, the radio was still for the most part dead, not a good thing! After the final capacitor was replaced, it sprang to life with clear reception and loud volume, go figure! The rubber grommets that the tuning capacitor mount to were completely gone. There were reproduced using some junk rubber parts from my parts bin. Next a wiring harness and plug were made for the speaker. The speaker plug on the back of the chassis was the same configuration as four pin type tubes, and luckily I had a four pin plug in my parts stock to use. Below center: The repaired chassis and replacement speaker.
While the radio was working quite well, the shadower meter was not. I was able to get a decent shadow by adjusting the lamp mounted on the back of the unit. Even with a strong signal, the movement was not very much. A little bit of reading revealed that a bad shunt resistor could be the cause. Wait a minuet...The original shunt resistor had been cut out of the circuit in my radio! My radio required a 2900 ohm replacement. Once this was wired in, the shadow meter was working good. The final step was an alignment, which made the meter work even better. Below center: The completed radio installed in the cabinet in fall 2009 after repairs, over two years after the initial restoration.
The missing tube
shields were eventually found and purchased from Play Things Of Past. The
original rubber chassis washers on the corners were all long gone. Some
reproductions were purchased from Renovated
Radios.
Cosmetic Restoration
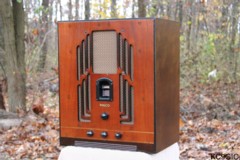
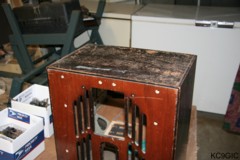
As seen in the "before" photo at the top of this page, the cabinet had several major flaws. The original finish was trashed, not to mention a dozen or so holes had been drilled in the front panel. Some scrubbing pads, lacquer thinner, and rubber gloves were used to remove the remaining original finish. Beforehand, several photos were taken of the cabinet so the color scheme could be reproduced. The veneer was in very good shape despite the condition of the rest of the radio. I only knew of two options to fix the front panel. Either replace the whole sheet of veneer or just fill in the holes with wood filler and tone them to match the rest of the wood. I opted for the second choice as my veneer cutting skills are not the best. Below photos: Left: the cabinet before being refinished, Right: The chipped escutcheon.

Cosmetic Restoration
As seen in the "before" photo at the top of this page, the cabinet had several major flaws. The original finish was trashed, not to mention a dozen or so holes had been drilled in the front panel. Some scrubbing pads, lacquer thinner, and rubber gloves were used to remove the remaining original finish. Beforehand, several photos were taken of the cabinet so the color scheme could be reproduced. The veneer was in very good shape despite the condition of the rest of the radio. I only knew of two options to fix the front panel. Either replace the whole sheet of veneer or just fill in the holes with wood filler and tone them to match the rest of the wood. I opted for the second choice as my veneer cutting skills are not the best. Below photos: Left: the cabinet before being refinished, Right: The chipped escutcheon.
Once the cabinet was stripped, different sections were masked off to be
toned. The most difficult part was toning the grill bars. It took me a
few times to achieve good results. The whole cabinet was then coated
with clear lacquer. The black plastic escutcheon had several big chips
in it, most noticeably where you looked through to see the dial and
shadow meter. Automotive Bondo was used to fill in the missing pieces,
and sanded down to the original form. The whole escutcheon was then
coated with black lacquer. Below
photo: The refinished cabinet.
The original grill cloth backing was missing, but some nice reproduction cloth had been tacked into the cabinet. A new backing was made using some 1/4" fiber board. When I first restored this radio in 2007, I used the grille cloth that had come with the radio. I eventually would replace this with the correct type for a Philco model 118. The final step was finding some replacement knobs. A complete set was found at Vintage Electronics.
Final Thoughts
This radio was definitely worth the initial $22.50 that I paid for it. It took well over a year to track down the missing parts, and around a month and a half to restore. Total costs are estimated at somewhere between $100 and $130.00, not bad for a completely restored Philco tombstone. Performance is excellent with the push/pull amp delivering powerful and clear sound. Being a great sounding receiver, this one is played often in my radio room.